Introduction
A brief overview
General presentation
MapMint4ME means MapMint 4 (for) Measure and Evaluation, It is an Android application that collects and edits geospatial data in online or offline mode.
MapMint4ME requires a connection to a MapMint GIS Server with editable tables. These tables allow for the collection of field data using the MapMint4ME Android App, but also allow users to view, edit and produce reports using the MapMint Server.
- Using MapMint4ME to record data in the field from your Android phone or tablet is straightforward:
import: connect to MapMint Server and download a local copy of the field data collection forms.
edit/view: record your data, then (re-)view recorded attribute.
export: Once field data collection is complete, upload the recorded data back to the MapMint Server.
In case you would like to get access to “basemaps” during your offline data recording, then tiles need to be pre-generated using the MapMint tools. manually.
The schema below summarizes the MapMint4ME mechanisms detailed in the next sections.

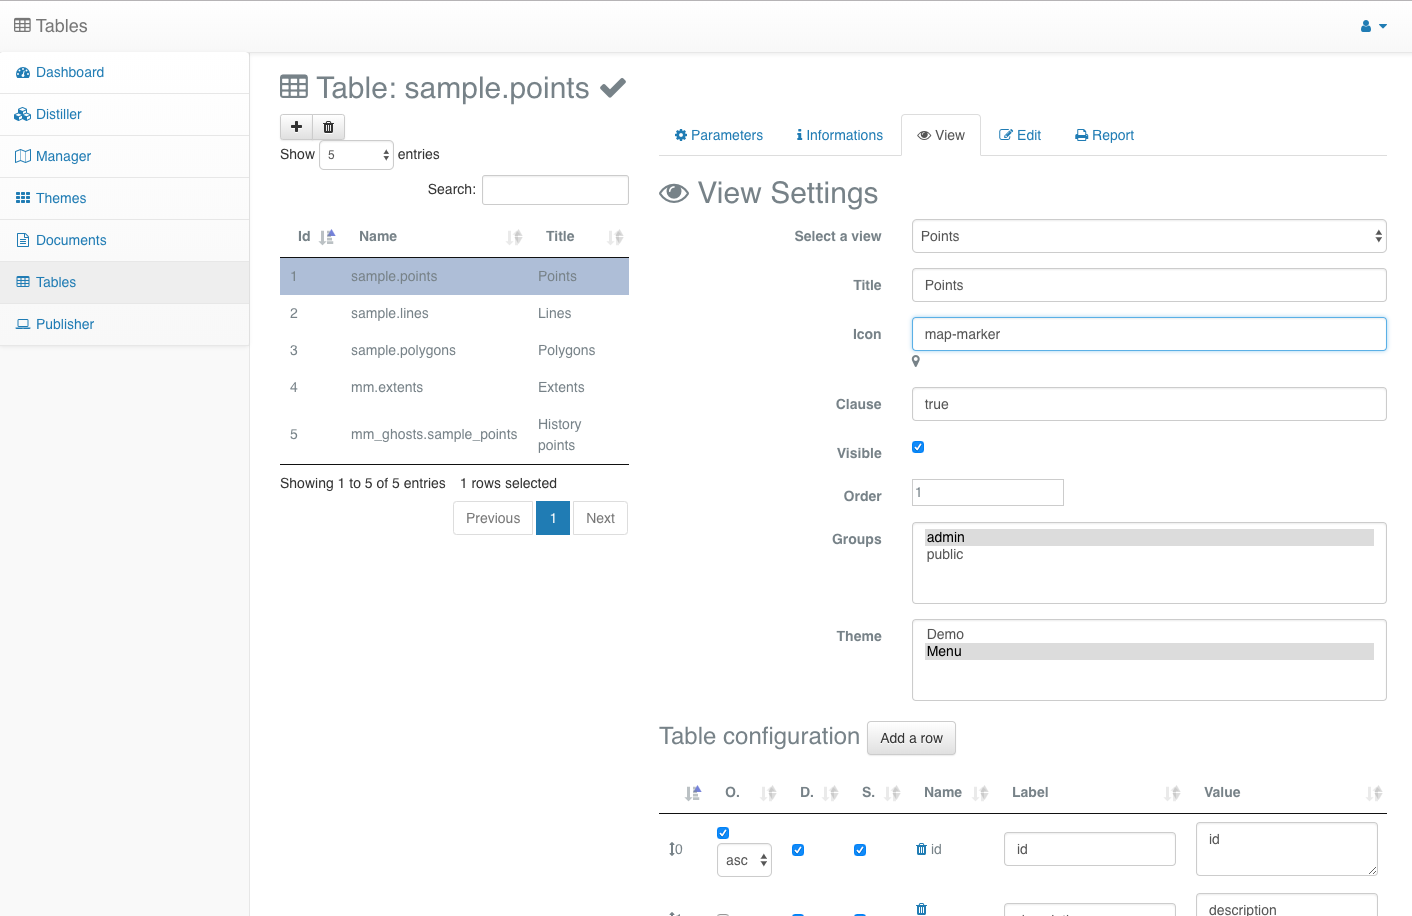
MapMint Table module
MapMint Table module is composed of an administration interface that allows for the configuration of some PostgreSQL tables as editable online and a client interface where users can login to view, edit and produce a report about their data.
MapMint Table Admin |
MapMint Table Client |
|
|
MapMint4ME Android application
1. Importing
As outlined in the introduction, MapMint4ME relies on a MapMint server. The MapMint Server is responsible for #########NOT CLEAR, CHECK GF####This last has the responsibility to provide the data to be recorded on the field with or without internet connectivity.
The MapMint Server uses a PostgreSQL database for data storage, whilst a SQLite database format is used on the MapMint4ME Android app. Consequently, the MapMint server provides a WPS Service to convert the PostgreSQL database into SQLite one.
If on the server side there is only one PostgreSQL database to store all tables in a centralized manner, the conversion process generates two databases: one to store the data and another one for the forms configuration and dependency tables, used for storing data displayed in the selection list. We have split the database for lowering the size of the database to upload back to the MapMint server.
The MapMint4ME Android application can download another database used to access a set of Tiles corresponding to the extent of your recording session.
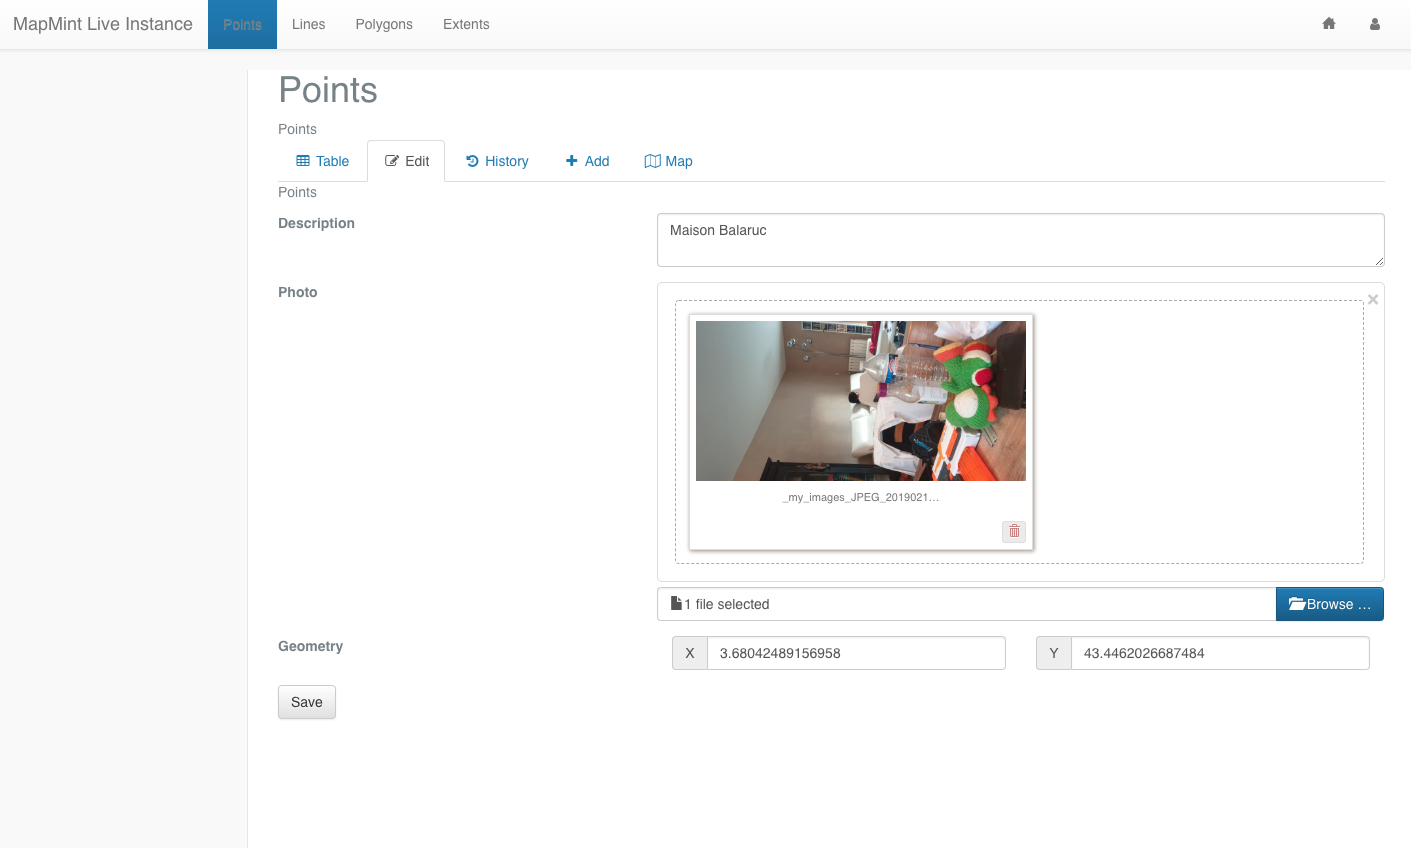
2. Recording
You can record and visualize data in the field by using the Edit, View and Map modules. The Edit module gives you the capability to edit all tables configured as editable by a group of users. The View module gives you access to a similar display as you can get from the MapMint Table module online, meaning that you can view a list of available tuples in tables. The Map module visualizes your recorded data on a basic map presenting recorded points, lines and polygons.
3. Exporting
Once the field data collection is complete, and you have WiFi connectivity (or sufficiently strong 4G signal), you can use the MapMint4ME Export Module to upload your data back to the MapMint server.
At this point, the MapMint server will extract and convert the field data from the SQLite database to PostgreSQL. As outlined previously, only the recorded data will be uploaded back and not the configuration or dependency tables. At usage, during the Senegalese project for which we have created this MapMint4ME Android application, we realized that sometimes the dependencies tables are too big to be uploaded back to the server.
The workshop content
Schedule
During this workshop, you will be introduced to the basic configuration required for activating the Table module from MapMint to build forms so that data can be edited online and from MapMint4ME. Then, you will install the MapMint4ME Android application on your phone or tablet and get it ready for data collection. Afterwards, you will go outside and map the area around the workshop building. After 30 minutes of data collection, you will come back to the workshop room and upload the data back to the MapMint server. Using this data, you will publish a new project to give access to your data.
Throughout the workshop, you will use the Demo server, available at https://demo.mapmint.com/ui/Dashboard_bs, rather than your own, using the following information: login: wsadmin / password: demo2019. It will ease the connection settings from MapMint4ME Android application, table creation and configuration of the edition forms. In addition, it will also permit to share the data recorded by every team on the same server.
Note
Please, at any time, do not hesitate to ask the presenters any question you have during the workshop.
Before going any further, you have to figure out what shall be the final forms that we are willing to use for going on the field for data collection. Below, you can see the definition of what the final form should be.
You will create one form for the three different vector datatypes: points, lines, and polygons with the following attributes respectively.
wsxpoints:
Column |
Type |
|---|---|
name |
varchar(50) |
category |
integer (refering to a categories table) |
description |
text (HTML content) |
photo |
bytea |
geometry |
point |
wsxlines:
Column |
Type |
|---|---|
name |
varchar(50) |
category |
integer (refering to a categories table) |
description |
text (HTML content) |
geometry |
line |
wsxpolygons:
Column |
Type |
|---|---|
name |
varchar(50) |
category |
integer (refering to a categories table) |
description |
text (HTML content) |
geometry |
polygon |
Pre-requisites
You will need to create the tables to store the data you want to allow your users to edit in the field. To do so, you are requested to load the Distiller module and click on the mmdb DataStore to view the list of available DataSources.
From any of the layer listed, you can use the  button to access
the tool for converting vector. From this tool, select mmdb as
DataStore then, copy and paste the following SQL queries:
button to access
the tool for converting vector. From this tool, select mmdb as
DataStore then, copy and paste the following SQL queries:
-- Create table wsXpoints
CREATE TABLE sample.wsXpoints (
  id serial PRIMARY KEY,
  name varchar(50),
  category int4 references sample.categories(id),
  description text,
  photo bytea
);
SELECT AddGeometryColumn
  ('sample','wsxpoints','wkb_geometry',4326,'POINT',2);
-- Create table wsXlines
CREATE TABLE sample.wsXlines (
  id serial PRIMARY KEY,
  name varchar(50),
  category int4 references sample.categories(id),
  description text
);
SELECT AddGeometryColumn
  ('sample','wsxlines','wkb_geometry',4326,'LINESTRING',2);
-- Create table wsXpolygons
CREATE TABLE sample.wsXpolygons (
  id serial PRIMARY KEY,
  name varchar(50),
  category int4 references sample.categories(id),
  description text
);
SELECT AddGeometryColumn
  ('sample','wsxpolygons','wkb_geometry',4326,'POLYGON',2);